Its quiet fun to work with RFID based projects! In the previous article, we saw how to interface RFID with Arduino. Interfacing is the first step to create any useful project. So why don’t we create an RFID based Access Control System or an RFID based Door Lock using Arduino? The system I have designed here is a simple version of the project. This project can be enhanced with a lot of features (which I will be doing in the next version of this project – Advanced RFID based Door Lock). So lets begin!
Note:- You must read and do Interfacing RFID Reader with Arduino before proceeding with this project!
The circuit diagram to build this Simple RFID based Door Lock is given below. It’s the same circuit we used for interfacing tutorial. We will be enhancing this project with an LCD Module Display towards the end of this article. For the time being we will use Serial Monitor to display outputs.
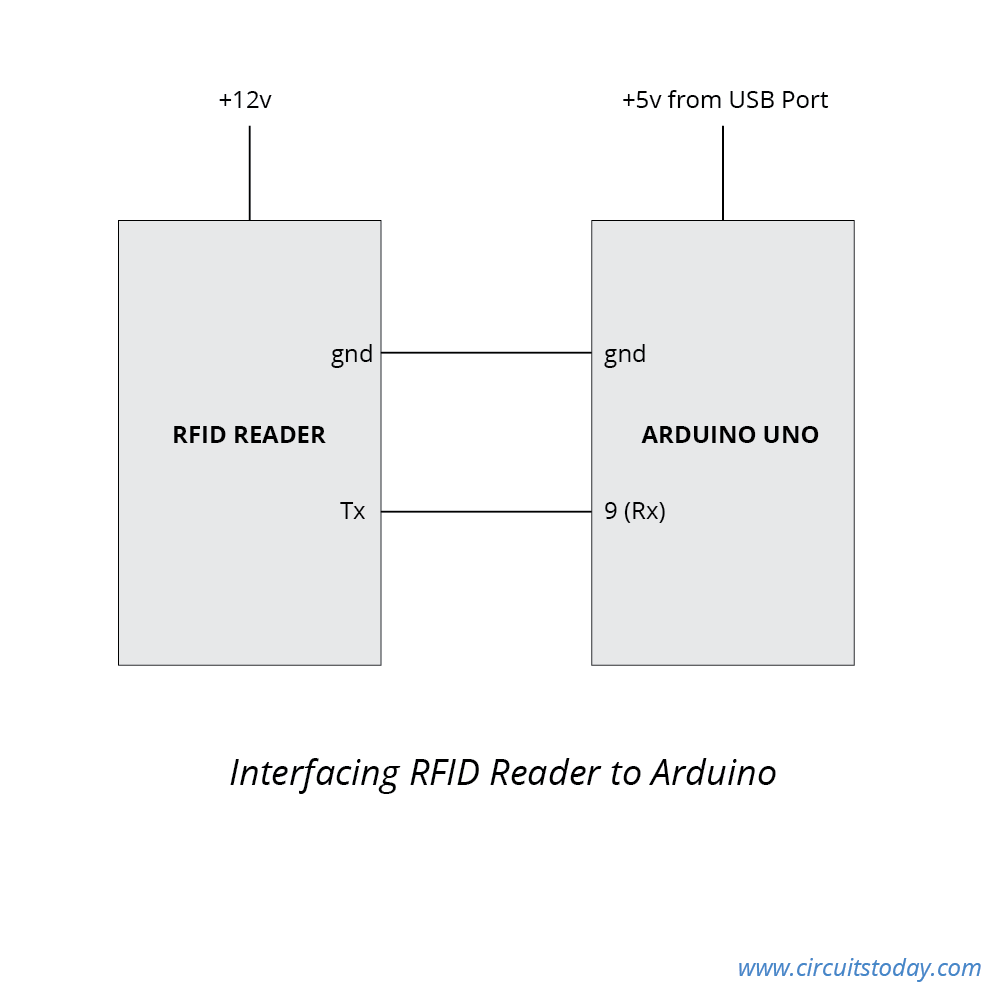
So that’s the circuit diagram! You need nothing more than this when you use Serial Monitor for output display. We need an LCD Display to make this project stand alone. So we will be wiring the LCD towards end of this article.
About the System Design
An RFID based Door Lock is based on some simple concepts. We store a set of RFID card data in our system, say 3 or 10 RFID card data. When the person with the right RFID card (compatible to data preloaded in our program/system) come and swipes his RFID tag, access will be granted. When the person with the wrong RFID card (whose data is not loaded in our system) swipes his RFID tag, access will be denied. I hope you understand the system concept of RFID based Door Lock.
Program/Code for RFID based Door Lock using Arduino
#include<SoftwareSerial.h>
SoftwareSerial mySerial(9,10);
int read_count=0;
int j=0,k=0; // Variables to iterate in for loops
char data_temp, RFID_data[12];
char Saved_Tags[3][12]={
{'1','8','0','0','8','E','0','4','8','D','1','F'},
{'1','8','0','0','8','D','C','0','2','E','7','B'},
{'1','8','0','0','8','F','G','6','7','W','2','A'}};
boolean tag_check,tag_status,entry_control;
void setup()
{
mySerial.begin(9600);
Serial.begin(9600);
}
void loop()
{
RecieveData();
CheckData();
AccessCheck();
}
void RecieveData()
{
if(mySerial.available()>0)
{
data_temp=mySerial.read();
RFID_data[read_count]=data_temp;
read_count++;
}}
void CheckData()
{
if(read_count==12)
{
entry_control=true;
for(k=0;k<3;k++)
{
for(j=0;j<12;j++)
{
if(Saved_Tags[k][j]==RFID_data[j])
{
tag_check=true;
}
else
{
tag_check=false;
break;
}
}
if(tag_check==true)
{
tag_status=true;
}}
read_count=0;
}}
void AccessCheck()
{
if(entry_control==true)
{
if(tag_status==true)
{
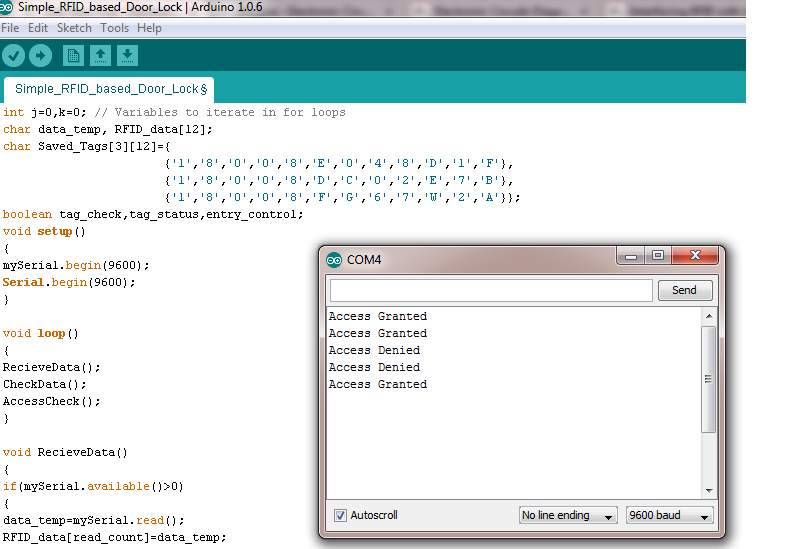
Serial.println("Access Granted");
}
else
{
Serial.println("Access Denied");
}
entry_control=false;
tag_status=false;
}}
About the Program
Note:- I have reused many parts from the interfacing RFID with Arduino tutorial. This will help you to understand the program better!
Lets begin with variables used in the program.
The variables data_temp, read_count and one dimensional array RFID_data[] serve the same purpose in interfacing RFID with Arduino tutorial.
Saved_Tags – is our 2 Dimensional array which holds preloaded RFID card data. In this example, I have loaded this array with data of 3 RFID cards.
tag_check – is a boolean variable used to hold the status of for inner for loop iteration (of CheckData() function). The comparison between preloaded data and the swiped card data happens inside CheckData() function. The swiped card data is available in one dimensional array RFID_data[]. The data in this array is compared with each card value inside our 2 Dimensional array (preloaded card data). The inner for loop performs this comparison of each row data of 2 D array with data inside RFID_data. With each successful comparison of elements, tag_check will maintain true value. If a comparison between elements fail, tag_check will be moved to false value.
tag_status – is another boolean variable used hold status of a completed comparison. This variable status is changed after one complete execution of the inner for loop. If the value of tag_check remains true after one complete cycle of inner for loop, it means the swiped card is a valid one and access can be granted. So we set this variable tag_status to true to make use of it in AccessCheck() function.
So that’s all! Now lets add an LCD module to this door lock and display lock status on LCD.
Simple RFID based Door Lock with LCD Display
The circuit diagram of our simple RFID based Door Lock using Arduino and LCD Display is given right below! You may wire up as shown in the diagram.
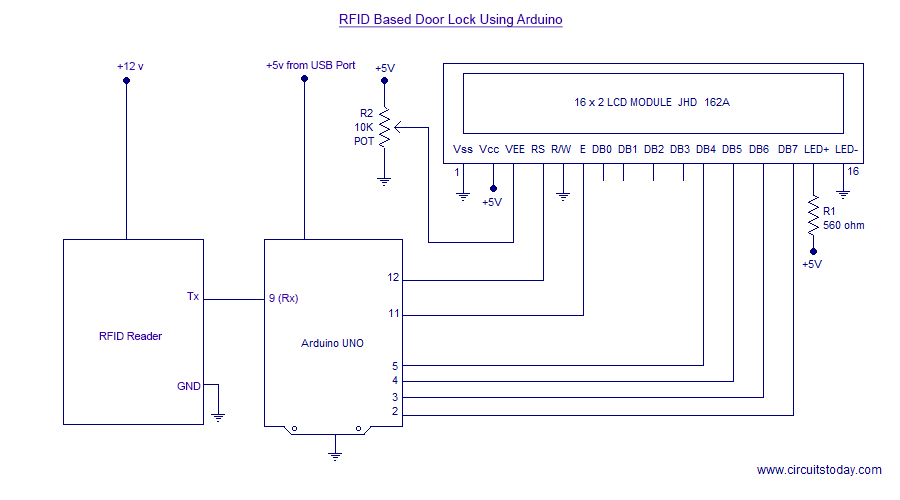
Note:- You may read our tutorial on Interfacing LCD Module to Arduino (if you are new to interfacing LCD with Arduino)
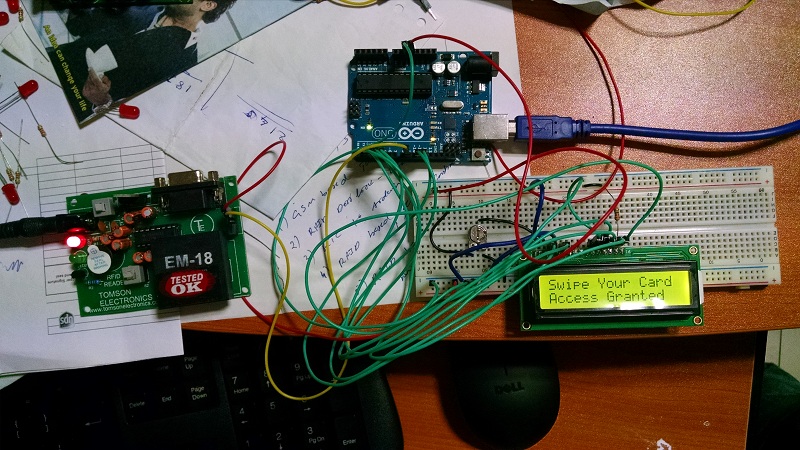
Implementation Photograph!
I am adding a photograph of my tested prototype!
Program for Adding LCD
We are using the above written program as such here as well. We just need to add a few lines to display on LCD module. I have attached the code below for downloading!
Download Program (RAR File) – Simple_RFID_based_Door_Lock_with_LCD
6 Comments
Hi,
Do you have a version for interfacing Mifare RFID CR038 with Arduino?
can I make a RFID reader using logic gates (without using arduino), preferably logic gates or microcontroller
how much is this?
@Alvin – We are yet to release a kit on this project.
Good! So when are you coming up with the LCD version?
@emma -Next week!