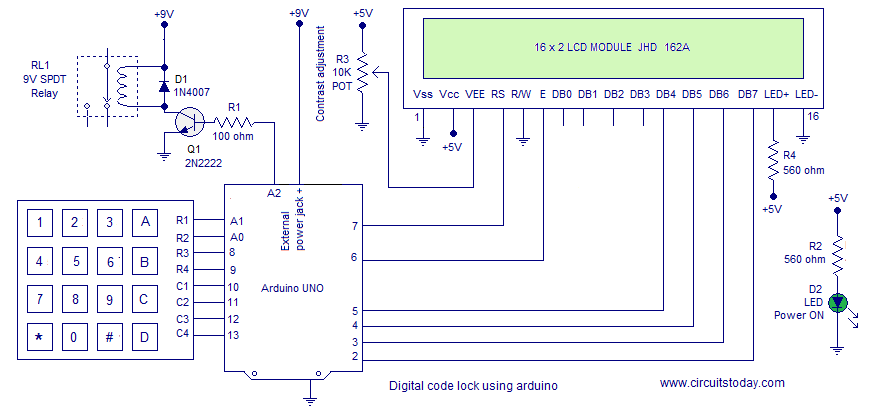
We have published a digital code lock using arduino some weeks before. This one is a little different. The earlier version was based on a defined password, where the user can not change it. Moreover there was no LCD display interfaced with the project to output lock status. This project is a much improved version of the same digital code lock which comes with a user defined password and LCD display. The user will be prompted to set a password at installation. This password inputted at installation will continue to serve the lock until it is changed. The user can change the current password with a single key press. The program will check for current password and allows the user to change password only if the the current password is input correctly.
Required Knowledge
You should learn two important device interfacing concepts before attempting this project. The very first one is to interface hex keypad with Arduino. The second one is to interface LCD with Arduino. Once you understand the concepts behind interfacing LCD module and interfacing hex keypad, its just a matter of adding few lines of code to build the Digital Code Lock. I recommend to read the simple digital code lock using arduino as well to gain insights into basics of a code lock.
Note:- In this program, I have reused the code developed for interfacing hex keypad with arduino. There are two versions of the program in the interfacing tutorial. I used version 2.
About the Program
I will be explaining important points about the program only. As mentioned before, you are supposed to know the codes of interfacing hex keypad and lcd module.
Usage of Device
Installation – You will be asked to input 5 digits as password at the initial boot/reset of the device. The first 5 digits you input at installation will be saved as your SET PASSWORD. The device will go LOCKED after setting PASSWORD.
Key A – for unlocking the device. Input correct password and press A for Unlocking.
Key B – for locking any time. Just press B and you will see the LOCKED message.
Key C – for changing the password. Input the correct password and Press C. You will see message asking to ENTER NEW PASSWORD. Enter 5 digits as password. The first 5 digits you enter will be SAVED as NEW PASSWORD.
Exceptions – You can not use keys ‘A’, ‘B’ and ‘C’ inside the password combination. These 3 keys are control keys of the device with specific functions. The program checks for these key presses (at the password setting time – you may see the SetPassword() function and look the condition to check for invalid key press) and identifies them as Invalid Keys. You will have to input 5 new digits as password after an Invalid Key press.
Important Variables and Arrays
pass[6] – is the array used to save and hold the user defined password.
check[6] – is the array used to collect & hold user input. This user input data (in check[] array) is compared with pass[] array to authenticate password.
entry – is the variable used to identify initial entry point of the program. User is asked to SET a 5 Digit Password at installation of Lock. Hence we need a variable to identify entry and loop 5 times to collect 5 digits and save them to pass[] array. The same variable is later made use of to Change Password. When the key for Changing Password (here ‘C’) is pressed, this variable is simply assigned a zero value (the initial state of variable). This forces the program control to re enter the Password Setting Loop of the program.
key_id – is the variable used to identify a key press and perform some actions in the program (that should happen only on a key press). By default this variable is set zero initial value. Whenever a key is pressed in key pad, this variable will be assigned a value =1. You may check the keyscan() function to see this. This simple trick helps to identify a key press and perform various actions on that key press (based on the value of key press). This variable is set to zero at different points in the program (to prevent the value 1 in key_id variable being identified as a false key press). You may check them as well.
Note:- col_scan – is the actual variable that gets activated to a LOW on key press (hence helps in identifying key press). But this variable is actually a part of the key pad interfacing program (version 2).
count – is the variable used to iterate the index of check[count] ( user input array ). count variable is initialized to 1. Each user input will be saved to check[] array in order of the increment of count variable.
temp_press – is a temporary variable to hold the value of key press. The value of key press is assigned to temp_press variable as a return result of the keypress() function. keypress() is the function defined to identify value of key press.
lcd_count – is a simple counter variable used to iterate the column position of LCD module. This variable helps to display user input data successively in row 2 of LCD module.
i,j,flag – are just dummy variables used in the program. i,j are used as counter variables inside for loop. flag is used to hold status of checkPassword() subroutine (the function used to compare user input data and the SET password ). A decision is made based on the value inside flag variable.
Subroutines used in the Program
SetPassword() – is the subroutine used to SET user defined password. This subroutine is very dependent on the “Password Setting Loop” written inside the main program. This password setting loop will be iterated at installation of the device (that is at the boot or reset of the device) for first 5 key presses. This first 5 key press will be used to SET the Password. These key presses will be saved to pass[] array. As mentioned earlier, entry is the variable used to iterate the loop 5 times. key_id is the variable used identify key press.
Note:- The same “Password Setting Loop” is made use of for Changing the Password as well. When key ‘C’ is pressed, the current password is checked for. If the input password is matching with current SET password, then entry variable will be assigned to zero value. This will simply transfer the control of the program to ENTER the Password Setting Loop again.
keyscan() – is the subroutine to scan keypad for a key press. This subroutine is basically same as the version 2 code of interfacing hex keypad to arduino. I have added some lines of code needed for this code lock. Apart from that, the lines of code in this subroutine is same as that of interfacing keypad. keyscan() subroutine scans for a key press (when ever the function is called from Main program or from other sub routines like SetPassword()) and identifies the row and column of the pressed key. If key ‘1’ is pressed, keyscan identifies that key at row 1 and column 1 is pressed. Similarly if key ‘6’ is pressed, the keyscan identifies a key is pressed at row 2 and column 3. When ever a key is pressed, another subroutine named keypress() is invoked within the keyscan() routine. This keypress() routine is used identify the value of key press (say ‘1’, ‘2’, ‘3’ or ‘A’, ‘C’ or ‘D’ etc)
keypress() – as mentioned above is the subroutine to identify value of key press. The keyscan() routine identifies which row and column of key pad is pressed. This row and column number is passed to keypress() routine as parameters (using variable values of i and j ).
checkPassword() – is the subroutine to check user input password against the SET User Defined Password. The user input data (password to cross check) is collected in the check[] array. This is compared against the SET Password inside pass[] array. A for loop is used for comparing. If each digit inside the arrays match, flag variable will remain zero. If any mismatch occurs, the flag will be set to 1 and loop will break.
So that’s all you need to know about the program. Read the program below and if you have any doubt, just drop a comment.
Program
#include<LiquidCrystal.h>
LiquidCrystal lcd(7,6,5,4,3,2);
int row[]={A1,A0,8,9};// Defining row pins of keypad connected to Arduino pins
int col[]={10,11,12,13};//Defining column pins of keypad connected to Arduino
int i,j,lcd_count,count=1,key_id=0,flag,entry=0;// See About the Program
int col_scan;// Variable to identify a key press
char temp_press; // Variable to hold value of key press
char check[6],pass[6]; // See About the Program

void setup()
{
lcd.begin(16,2);
for(i=0;i<=3;i++)
{
pinMode(row[i],OUTPUT);
pinMode(col[i],INPUT);
digitalWrite(col[i],HIGH);
}
lcd.print("SET 5 Digit PASS");
}

/* Main Program Begins */

void loop()
{
 while(entry<=4)// Password Setting Loop begins
{
SetPassword();
}
// Password Setting Loop Ends

key_id=0;
keyscan(); // Scan for a Key Press

/* Actions on Key Press begins */

if(key_id==1) // Condition to Check Key is Pressed
{
 check[count]=temp_press;
count++;

/* Condition to Unlock Begins*/

if(temp_press=='A')
{
  checkPassword();
if(flag==0)
{
lcd.setCursor(0,0);
lcd.print("UNLOCKED");

}else{
lcd.setCursor(0,0);
lcd.print("WRONG PASSWORD");
delay(200);
lcd.clear();
lcd.print("LOCKED");
}
count=1; // Resetting the counter variable
}

/* Condition to Unlock Ends*/

/* Condition to Change Password Begins */

else if(temp_press=='C')
{
checkPassword();
if(flag==0)
{
lcd.setCursor(0,0);
lcd.print("ENTER NEW PASS");
key_id=0;
entry=0;
}else{
lcd.setCursor(0,0);
lcd.print("WRONG PASSWORD");
}
count=1; // Resetting the counter variable
}

/* Condition to Change Password Ends */

/* Condition to LOCK Begins*/

else if(temp_press=='B')
{
lcd.setCursor(0,0);
lcd.print("LOCKED");
count=1; // Resetting the counter variable
}
/* Condition to LOCK Ends*/
}

/* Actions on Key Press Ends*/
}

/* Main Program Ends */


void SetPassword() // Subroutine to SET User Defined Password
{
keyscan();
if(key_id==1)
{
if(temp_press=='A'||temp_press=='C'||temp_press=='B') // Condition to Check for an Invalid Keypress
{
lcd.setCursor(0,0);
lcd.print("INVALID KEYS");
entry=0;
}
else

{
  pass[entry]=temp_press;

}
}
key_id=0;
if(entry==5)
{
lcd.clear();
lcd.setCursor(0,0);
lcd.print("PASSWORD SET & LOCKED");
}} // Subroutine to SET Password ENDS

char keyscan()// Subroutine to Scan Keypad for a Keypress
{
for(i=0; i<=3; i++)
{
digitalWrite(row[0],HIGH);
digitalWrite(row[1],HIGH);
digitalWrite(row[2],HIGH);
digitalWrite(row[3],HIGH);
digitalWrite(row[i],LOW);
for(j=0; j<=3; j++)
{
col_scan=digitalRead(col[j]);
if(col_scan==LOW)
{
  key_id=1;
  entry++;
temp_press=keypress(i,j);
lcd.setCursor(lcd_count++,1);
lcd.print(temp_press);
if(temp_press=='A'||temp_press=='C'||temp_press=='B')
{
lcd_count=0;
lcd.clear();
}
delay(300);
break;
}}
}}// Subroutine to Scan Keypress Ends

char keypress(int i, int j) // Subroutine to Identify the value of Key pressed
{
if(i==0&&j==0)
{
return('1');
}
if(i==0&&j==1)
{
return('2');
}
if(i==0&&j==2)
{
return('3');
}
if(i==0&&j==3)
{
return('A');
}
if(i==1&&j==0)
{
return('4');
}
if(i==1&&j==1)
{
return('5');
}
if(i==1&&j==2)
{
return('6');
}
if(i==1&&j==3)
{
return('B');
}
if(i==2&&j==0)
{
return('7');
}
if(i==2&&j==1)
{
return('8');
}
if(i==2&&j==2)
{
return('9');
}
if(i==2&&j==3)
{
return('C');
}
if(i==3&&j==0)
{
return('*');
}
if(i==3&&j==1)
{
return('0');
}
if(i==3&&j==2)
{
return('#');
}
if(i==3&&j==3)
{
return('D');
}
} // Subroutine to identify Keypress Ends

void checkPassword() // Subroutine to Check User Input Data with SET Password
{
flag=0;
for(i=1;i<=5&&flag==0;i++)
{
if(check[i]==pass[i])
{
flag=0;
}
else
{flag=1;
}}} // Subroutine to check password ends
Feel free to drop comments.
44 Comments
But what will happen of electricity is cut and the program starts again..will it ask for the set password again!!!…that isn’t desirable in real world applications..
Hai sir,
I trying this code using arduino Uno.,and i’ve a doubt in the code. that is how i input the password firstly.
Hi i was comments many time ago… Please can you give me the code with eeprom. what will ask for set password first time. then the program will check and get password from eeprom and never ask for set password again. and change password will write in eeprom too… I try this code… But it’s not working….
the code is……………………………..
#include
#include
#include
Servo ser;
LiquidCrystal lcd(7,6,5,4,3,2);
int row[]={13, 12,A5,A4};// Defining row pins of keypad connected to Arduino pins
int col[]={A0,A1,A2,A3};//Defining column pins of keypad connected to Arduino
int i,j,lcd_count,count=1,key_id=0,flag,entry=0;// See About the Program
int col_scan;// Variable to identify a key press
char temp_press; // Variable to hold value of key press
char check[6],pass[6]; // See About the Program
#define red 8
int bajaw = 0;
int buzzer = 11;
void setup()
{
Serial.begin(9600);
ser.attach(9);
ser.write(90);
pinMode(buzzer, OUTPUT);
lcd.begin(20,4);
pinMode(red, OUTPUT);
for(i=0;i<=3;i++)
{
pinMode(row[i],OUTPUT);
pinMode(col[i],INPUT);
digitalWrite(col[i],HIGH);
}
lcd.clear();
lcd.setCursor(0,0);
lcd.print("Smart Home");
lcd.setCursor(2,1);
lcd.print("Lock System");
lcd.setCursor(4,6);
lcd.print("PU");
delay(3000);
lcd.clear();
if(EEPROM.read(1) == NULL){
lcd.print("SET 5 Digit PASS");
} else {
lcd.print("Give Password…");
}
}
/* Main Program Begins */
void loop()
{
if(EEPROM.read(1) == NULL){
while(entry<=4)// Password Setting Loop begins
{
SetPassword();
}
// Password Setting Loop Ends
}
key_id=0;
keyscan(); // Scan for a Key Press
/* Actions on Key Press begins */
if(key_id==1) // Condition to Check Key is Pressed
{
check[count]=temp_press;
count++;
/* Condition to Unlock Begins*/
if(temp_press=='A')
{
checkPassword();
if(flag==0)
{
lcd.setCursor(0,0);
digitalWrite(red, LOW);
delay(100);
lcd.print("UNLOCKED");
}else{
lcd.setCursor(0,0);
lcd.print("WRONG PASSWORD");
bajaw++;
digitalWrite(buzzer, HIGH);
delay(2000);
if(bajaw < 3){
digitalWrite(buzzer, LOW);
}
lcd.clear();
lcd.print("LOCKED");
digitalWrite(red, HIGH);
}
count=1; // Resetting the counter variable
}
/* Condition to Unlock Ends*/
/* Condition to Change Password Begins */
else if(temp_press=='C')
{
checkPassword();
if(flag==0)
{
lcd.setCursor(0,0);
lcd.print("ENTER NEW PASS");
key_id=0;
entry=0;
}else{
lcd.setCursor(0,0);
lcd.print("WRONG PASSWORD");
bajaw=bajaw+1;
digitalWrite(buzzer, HIGH);
delay(1000);
if(bajaw < 3){
digitalWrite(buzzer, LOW);
}
}
count=1; // Resetting the counter variable
}
/* Condition to Change Password Ends */
/* Condition to LOCK Begins*/
else if(temp_press=='B')
{
lcd.setCursor(0,0);
lcd.print("LOCKED");
digitalWrite(red, HIGH);
count=1; // Resetting the counter variable
}
/* Condition to LOCK Ends*/
}
/* Actions on Key Press Ends*/
}
/* Main Program Ends */
void SetPassword() // Subroutine to SET User Defined Password
{
keyscan();
if(key_id==1)
{
if(temp_press=='A'||temp_press=='C'||temp_press=='B') // Condition to Check for an Invalid Keypress
{
lcd.setCursor(0,0);
lcd.print("INVALID KEYS");
digitalWrite(buzzer, HIGH);
delay(500);
digitalWrite(buzzer, LOW);
entry=0;
}
else
{
pass[entry]=temp_press;
int entryy = entry + 1;
EEPROM.write(entryy, temp_press);
}
}
key_id=0;
if(entry==5)
{
lcd.clear();
lcd.setCursor(0,0);
lcd.print("PASSWORD SET & LOCKED");
digitalWrite(red, HIGH);
delay(100);
}
} // Subroutine to SET Password ENDS
char keyscan()// Subroutine to Scan Keypad for a Keypress
{
for(i=0; i<=3; i++)
{
digitalWrite(row[0],HIGH);
digitalWrite(row[1],HIGH);
digitalWrite(row[2],HIGH);
digitalWrite(row[3],HIGH);
digitalWrite(row[i],LOW);
for(j=0; j<=3; j++)
{
col_scan=digitalRead(col[j]);
if(col_scan==LOW)
{
key_id=1;
entry++;
temp_press=keypress(i,j);
lcd.setCursor(lcd_count++,1);
lcd.print(temp_press);
if(temp_press=='A'||temp_press=='C'||temp_press=='B')
{
lcd_count=0;
lcd.clear();
}
delay(300);
break;
}}
}}// Subroutine to Scan Keypress Ends
char keypress(int i, int j) // Subroutine to Identify the value of Key pressed
{
if(i==0&&j==0)
{
return('1');
}
if(i==0&&j==1)
{
return('2');
}
if(i==0&&j==2)
{
return('3');
}
if(i==0&&j==3)
{
return('A');
}
if(i==1&&j==0)
{
return('4');
}
if(i==1&&j==1)
{
return('5');
}
if(i==1&&j==2)
{
return('6');
}
if(i==1&&j==3)
{
return('B');
}
if(i==2&&j==0)
{
return('7');
}
if(i==2&&j==1)
{
return('8');
}
if(i==2&&j==2)
{
return('9');
}
if(i==2&&j==3)
{
return('C');
}
if(i==3&&j==0)
{
return('*');
}
if(i==3&&j==1)
{
return('0');
}
if(i==3&&j==2) {
return('#'); }
if(i==3&&j==3) {
return('D'); }
} // Subroutine to identify Keypress Ends
void checkPassword() // Subroutine to Check User Input Data with SET Password
{
flag=0;
for(i=1;i<=5&&flag==0;i++) {
Serial.print(EEPROM.read(i), DEC);
if(check[i]==pass[i] || check[i]==EEPROM.read(i)) {
flag=0; }
else {flag=1; }
}
} // Subroutine to check password ends
Hi, i have problem with your code. I used 6 digit password. I set pass is 123456. LCD print PW SET & LOCKED. I press over 6 digit and my system is not accept my pass ( 123456) . How i can fix it. Thanks ….
@Tommy – Its a mild glitch in your code. Try reworking it!
You are not replying some coment how ever. I have few questions:-
1- there is no relay module controlling program in your sketch.
2- there is a big loophole to crack the security system. Becuase the power when there is a power failure the system will prompt to set the initialization password so.you are a maker think about it. There is a idea eeprom but i tried but not working
I think you can
Please replay iam waiting for your answer.
we make this project. yes it is working 🙂
Sir iam actually a beginer and i need this. Project. Would you please put the code for accessing eeprom. Not only for me for every one i think. We think you will do it for your followers. We didnt kbow how the coding …..please
Yeah… Thats right iam also trying pls… Give us the code for using EEPROM 🙂
Hi Sir
I am New To Electronics Circuits
I am Trying To Make This Project On Arduino Mega 2560 + LCD 1602 + Servo Motor + 4×4 Keypad
Please Could You Make Youtube Tutorial For Better Understanding. So Everyone Can Learn From Your Digital Lock System.
Could You Please Explain Relay Connections
Where Do I Connect Servo Motor
or Please Give Us Link Of Some Pictures Of Your Project
Thanks And Regards
Babulal Gandhi
did you complete this project??
I need some help regarding this so please reply
Hi Sir.
Very Nice Tutorial. Though I Have Searched Whole Internet For Arduino Password Lock
Arduino Uno Or Mega + Liquid Cristal + Keypad And Servo Motor Combination.
There Is No Better Sketch Explanation Then Yours.
Though I Have Problem Understanding Diagram. Could You Please Clarify
1. +9v Going To Relay,
2. +9v Going To External Power Jack.
How Can We Give +9v To Relay(RL1 9V SPDT Relay.
Sir Could You Please Make Video On This Project With Component Details And Their Wiring Details And Upload On Youtube
Thanks & Regards
Babulal Gandhi
it working , but i connect a relay 5v coil appear not working
I tried this code using adruino mega and a 4×3 keypad, and it turns out that the first row of the keypad cant be pressed(1 2 3) and it doesnt display on my lcd. Do you know why?
good day.. thanks for this project, it’s a great help for my thesis.. but i have a little problem.. i want to add a gsm module to make it more convenient.. how can i make this possible? i have tried adding the basic sending codes of the gsm to this codes but after setting up the password, the keys can’t be scanned anymore..pls help.. thanks!
Hi… Thanks for this tutorial. It’s work properly. Please help me to make user defined password as permanent password. I try so many time. But can’t do it. Please Help me… It will once when user can set a password. After set user can change password as here given. Please help me…
@Shanjedul – You have to use memory (EEPROM) to store a permanent password
How it is
I have a little problem, I can’t find the code to control the relay when the “sistem” is unlocked, could you provide something like that ?
I have a relay module for arduino.
Thank you
hi sir its work thanks but the out put is via 9V relay right?…i cant connect it properly
so my result is ok ,until the display but my lock is not working so kindly help me how can i operate my lock from this signal …thanks ..again
@john – are you using a 9V relay ? You have to connect relay using a relay driver (transistor 2N2222). If a 9V relay is not available, you can connect using a 12V relay as well (make sure you have a separate 12V power supply to power the relay)
will it works in arduino uno R3 ? pls clear this dbt
Yes!
PLS ON WHAT VERSION OF ARDUINO CAN ONE VERIFY THIS CODE. I TRIED IT ON THE VERSION I HAVE AND IT IS GIVING ME AN ERROR CODE 403, SPI WAS NOT DECLARED, PLEASE HELP.
@Efurhieme – We tested this on Arduino Uno. This code is version independent.
hi
i´ve been trying do it but when i turn on, the display insert automatically *147.
which problem can be?
sorry for bad english
@Tiago – Please recheck your code.
the code is the program that is above
hi praveen
Thanks for the code but I’m wondering why would you set the “count” variable to 1? Would that not mean when you pass the value of temp_press into check[count], then 2nd digit would be initialised, leaving the first digit of check empty?
@cheng – The check[] array begins at 1 and goes on to 2,3,4,5. There is no check[0]. There are only check[1], check[2].. to check [5]
You got it ?
hi praveen
Thanks for the code but I’m wondering why would you set the “count” variable to 1? Would that not mean when you pass the value of temp_press into check[count], then 2nd digit would be initialised, leaving the first digit of check empty?????
just curious, will the password reset option wipe out password data making it crackable?
@mpesa – No, It won’t! The password reset option asks for current password and verifies it!
Hi Praveen,
nice code. I’ve been looking a long time for a code where you can change the password. Unfortunately, there is only a problem when the power fails, the current password is away. I´d be nice if it would be Saved.
@R@ge – You can save the password by accessing Arduino’s EEPROM Memory
plz tell me the application of the circuit in full detail with examples
Please tell me the application of this above project.
@swathi – You can use this to build Digital Door Lock, Access Control System in Offices etc. View some of these videos – https://www.youtube.com/results?search_query=digital+door+lock
Thnx for the project with complete Details….. Best Website For electronics Professionals