Diodes are one of the components that can be tested very easily.Ordinary diodes as wells as Zener diodes can be checked by using a multimeter. While testing a diode the forward conducting mode and reverse blocking mode has to be tested separately.
Testing ordinary diode using a digital multimeter.
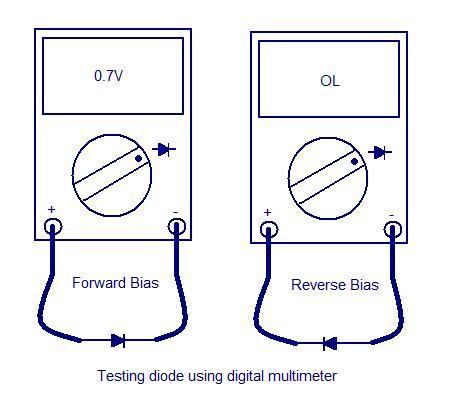
To check an ordinary silicon diode using a digital multimeter, put the multimeter selector switch in the diode check mode. Connect the positive lead of multimeter to the anode and negative lead to cathode of the diode. If multimeter displays a voltage between 0.6 to 0.7, we can assume that the diode is healthy. This is the test for checking the forward conduction mode of diode. The displayed value is actually the potential barrier of the silicon diode and its value ranges from 0.6 to 0.7 volts depending on the temperature.
Now connect the positive lead of multimeter to the cathode and negative lead to the anode. If the multimeter shows an infinite reading (over range), we can assume that the diode is healthy. This is the test for checking the reverse blocking mode of the diode.
For testing Germanium diodes, the procedure is same but the display will be between 0.25 to 0.3 V to indicate a healthy condition in the forward biased mode. The potential barrier for Germanium diode is between 0.25 and 0.3V. When reverse biased the multimeter will show an infinite reading (over range) to indicate healthy condition.
Testing ordinary diode using analog multimeter.
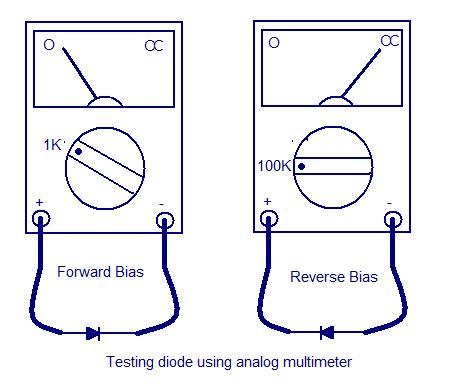
To check an ordinary Silicon diode using an analogue multimeter, put the multimeter selector switch in a low resistance position (say 1K). Connect the positive lead of multimeter to anode of the diode and negative lead of multimeter to cathode of the diode. If meter shows a low resistance reading, we can assume that the diode is healthy. This is the test for checking forward biased mode of the diode.
Now put the multimeter selector switch in a high resistance position (say 100K).Connect the positive lead of multimeter to cathode of the diode and negative lead to anode of the diode. If the meter shows an infinite reading, we can assume that the diode is healthy. This is the test for checking the reverse blocking mode of the diode. The meter shows infinite or very high resistance reading because a reverse biased diode has a very high resistance (usually in the range of hundreds of K Ohms).
Testing Zener diode.
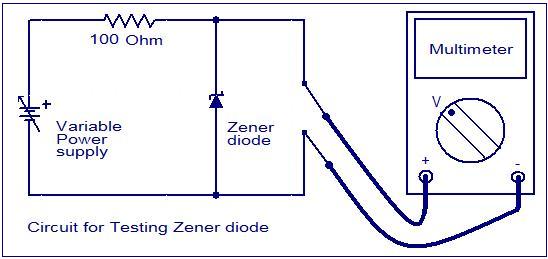
The forward characteristics of a Zener diode is similar to an ordinary diode. So the methods used for testing forward conducting mode of any ordinary diode is applicable to the Zener diode too. But in reverse mode, the reverse breakdown voltage has great significance and it has to be specifically tested.For example a 5.3V Zener diode must start conducting only when the applied reverse voltage just exceeds 5.3V. The reverse bias mode of Zener diode can be easily tested by using the circuit given below.The resistance R1 can be typically 100 Ohms. The multimeter must be in voltage mode. Now slowly increase the output of variable power supply and at the same time observe the voltage shown in the multimeter. The multimeter display increases along with the increase in power supply voltage until the breakdown voltage. Beyond that the multimeter reading stays put despite of the power supply voltage. This is because the Zener diode is now in breakdown region and the voltage across it will remain constant irrespective of the increase in supply voltage and this constant voltage will be equal to the breakdown voltage. If the reading of multimeter in this instant is equal to the breakdown voltage specified by the manufacturer, we can assume that the Zener diode is healthy.
While carrying out this test, remember not to exceed the input excitation voltage to a point that forces the Zener diode to dissipate more power than it can safely handle. Typically current through the diode should not be allowed to exceed more than 10mA.


14 Comments
Thank You For a most Excellent Post….You Are Awesome!!!!
You have drawn the analogue multimeter around the wrong way and the needle will always move across the screen to indicate 0.7v is being dropped, even though you have the meter on any of the ohms scales.
It is not measuring the resistance of the diode but the voltage drop across it.
i like learning etronic
I need to test all the components of my hp laptop charger. Kindly am requesting you to send me the ways to my mail as a video or as words.
why should we test in reverse bias condition
We Need To Check The Diode In The Reverse Condition To Determine If The Diode Is LEAKY Or Not
Nice write up.This explains it better than we are taught.
actually diode is pn junction.
good and informative site
Hi Vysakh The test voltage in case of DMM is less than 2.5 volt hence knee voltage is higher than 2.0volt cannot be displayed. This is the reason you cannot check Diac also with multimeter.
Wow! Its a nice artical, hopefull we all have enjoyed! Thanks again
in diode selector mode the forward biased condition only showing low resistance (400-850R without any external supply) . It doesnt showing knee voltage . In reverse condition showing infinite reading (always 1) in the case of digital meter 🙂
Thank You, this was very helpful for a solar project that I am working on. Cheaper panels don’t come with the blocking diodes and I needed to know how to test the ones that I scrounged up, the write up jiggled my memories on how to drive my multimeter.
its a nice post! enough length for article & well structured…put some more like this