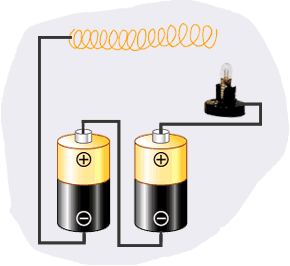
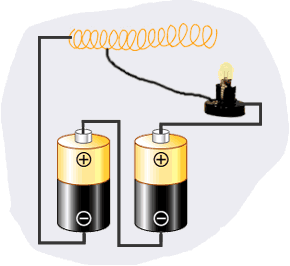
Although the below explained process is not applicable for any electronic circuits, you will clearly get a clear idea on how a rheostat works.
DIY Rheostat – Components
- The components needed for the connection are
- Flashlight bulb and socket [1]
- Dry cell lantern battery/D-cell battery [2]
- Wire [About 15 to 17 inches and another one 2 inches]
- Spring [1]
- Wire Clippers [A pair]
- A typical spring can be obtained from a widow roll up. You can even get to buy one at a cheap rate.
Procedure
- Connect the two Dry cell lantern/D-cell batteries tail-to-tail, so that the positive polarity of one battery is connected to the negative polarity of the other.
- Using a wire cutter, cut the wire in equal lengths. One wire should be at least 8 centimetres long.
- Connect the wires onto the open ends of both the batteries.
- The end of one wire must be connected to the bulb socket with the bulb in it.
- Connect the second wire to one end of the long spring.
- Connect the free end of one wire to one terminal of the light socket.
- Connect the other free wire to one end of the spring.
- Take the two inch wire and connect it to the second terminal of bulb socket.
- Connect the other end of the two inch wire onto the other end of the spring.


What happens?
As soon as the circuit is in closed loop, the bulb begins to glow. Although the glow intensity is less, when you move the wire through the spring onto the other end where the wire is connected, the bulb starts to glow more brightly. When both the wires are nearby the glow will be in its maximum.
The spring is mainly made of steel wire. Steel wires are not very good conductors of electricity. Thus the resistance of the circuit also increases. If the spring length is long enough you will get to see different stages of the glow. Thus you will get to see the working of a rheostat.
Additional resource – Here is how a rheostat works;
TAKE A LOOK : POTENTIOMETER AND RHEOSTAT – WORKING AND COMPARISON

9 Comments
Hi,
HOW TO MAKE RHEOSTAT topic is used for my project. so, please send details in my mail id. about this topics
Hi Murugan In simple words we can explain as, a small forward current flow through base emitter junction will make a large current flow through collector emitter junction. in other words we can say by varying the forward current through base emitter junction will vary the current through the Collector emitter junction. That is collector emitter resistance will change as per the forward bias current change to base emitter junction, thus the current flow through collector emitter junction. since collector emitter resistance changes as per the base bias, that is transfering of base emitter information as resistive function of collector emitter (that is trans-resistor – hence the name transistor). hope enough confusion. you will get more theoretical details from the following site, http://amasci.com/amateur/transis.html
How transistor works..?